jueves, 9 de noviembre de 2023

Freeing your phone from Linux (with heimdall for Samsung)

When I wrote about updating baseband I realised that I hadn't written about how to install an aftermarket ROM, so... here we go.

The typical journey of installing an aftermarket ROM Like LineageOS, crDroid, ... which means replacing the propietary ROM of your phone with a hopefully free OS that is updated more frequently and for a longer time, starts with unlocking your mobile phone's bootloader, that depends on your maker, or even your model, so you must find an specific guide on that, typically it means enabling developer mode oand then looking for a

OEM unlock option.

Then you must install a recovery, you have to choose the specific one for your phone from all the available ones. Both LineageOS and crDroid have their own simple recoveries, and you have of course the good old TeamWin, OrangeFox, ... you just need to find the one you like and is available for your phone and then we install it.

After installing the recovery we have half the work done, as we can boot into it and from there we can flash our chosen OS and then the Google Apps or maybe you prefer to choose microG instead.

But... how do we install the recovery... on some devices you have a fastboot bootloader, there you must use the fastboot tool doing something like:

fastboot flash recovery recovery.img either if you are on Windows or Linux, but for Samsung devices... you either use Samsung tools for Windows like the old Odin, or if you are on Linux... yes, you need the latest version of heimdall (2.0.2 as I write this).

Once you have the latest heimdall installed we get the phone to start the bootloader or download mode and plug it to our computer, there we can run

heimdall flash --VBMETA vbmeta.img --RECOVERY recovery.img where the vbmeta image is specific for your model and is needed so that we are allowed to install our recovery and our chosen OS. One thing about heimdall... you can use the --no-reboot option, and so the phone won't reboot after heimdall exits, however, on modern phones and at least on heimdall versions up to and including 2.2, you won't be able to run heimdall again to do some other task without rebooting, it will fail, so... you must reboot anyway.

After installing the recovery we must boot it, not the OS, if you boot to the OS just once, it will restore the old recovery and you'll have to start all over, so... after you execute heimdall, make sure you press the right keys to boot into recovery.

That's it, I know it sounds a bit complicated, but, if you do things right, you can forget about Samsung's crap forever and enjoy your chosen system for a hopefully long time. I hope this new experience with your phone pleases you, enjoy it!

viernes, 27 de octubre de 2023

Updating baseband on Samsung devices when you are running aftermarket ROMs.

Some time ago I wrote about heimdall and how you could flash a Samsung official ROM using it. This time we'll be talking quite about the opposite.

When you are running an aftermarket ROM (one that is not the one from the maker of your phone) like an official LineageOS or crDroid ROM you get regular updates from them, but what you typically don't get is updates for the baseband.

The baseband is the software that runs the communication processor or modem, it is an important part of your phone as it is in charge of all the communications, so having it updated is important, not only because of the functionalities, but also because of the security issues.

So... the problem here is... how do you update your baseband now that you are no longer running your phone's official ROM? You could backup and flash your updated Samsung official ROM and then reinstall your favourite ROM and restore from backup, but that's a nonsense, so...

How about flashing just the modem software and leave your favourite ROM untouched?

Well, for that we can rely on heimdall, just make sure that you run the latest version of heimdall (2.0.2 as I write this). First you must download the Samsung updated ROM from your favourite site, we need the CP archive, something like...

CP_A705FNXXU5DWB1_CP23709798_CL24363203_QB62257661_REV00_user_low_ship_MULTI_CERT.tar.md5

for the A70, note that while this ends on md5 it is just a normal tar file, then extract the files from it, in this case modem.bin.lz4 and uncompress it with unlz4 and you'll get the modem.bin file that you must flash, now we just need to find where we need to flash it, we look for the name of this file on the heimdall print-pit output and we'll get the Partition Name, in this case MODEM, so we run...

heimdall flash --MODEM modem.bin

That's it, enjoy your new baseband ;-)

domingo, 9 de octubre de 2022

Windows 11 en una máquina vieja vía libvirt en Linux

Entre los requirimientos de Windows 11 están una CPU moderna, arranque EFI seguro y un dispositivo de seguridad TPM versión 2.0. A continuación os comentaré como lo instalé sin trucos en una máquina virtual dentro de una máquina que no tiene ni TPM ni arranque seguro EFI, así que el único requerimiento que cumplía era el tener una CPU algo moderna, con virtualización hardware, claro.

Para poder probar cosas con el Windows 11 en el trabajo he querido instalar Windows 11 como siempre hago con los Windows, es decir, en una máquina virtual dentro del sobremesa, hasta ahora siempre lo he hecho con VirtualBox, es cómodo y cumplía con lo que yo necesito.

Sin embargo en este caso, si queremos instalar Windows 11 sin trucos, necesitaremos un dispositivo de seguridad TPM, que no existe en VirtualBox, así que... he explorado un poco el mundo de libvirt usando por debajo KVM, que sí que nos permite usar un TPM software y el resto de cosas que necesita Windows 11 para funcionar.

He utilizado los paquetes de Bookworm (ahora en testing mientras no se convierte en la nueva estable) para contar con las últimas versiones y no tener que andar haciendo las cosas "a mano" editando los XML y tal, con las versiones de Bookworm se puede hacer todo en plan gráfico sin problema, con versiones anteriores igual también se puede, pero en algunas hay que tocar los XML a mano.

La cosa para mi ha sido instalar por un lado la parte de libvirt, instalé estos paquetes: virt-manager virt-viewer libvirt-daemon-driver-qemu libvirt-daemon-system libvirt-daemon-system-systemd libvirt-daemon-config-nwfilter libvirt-daemon-config-network libvirt-clients gir1.2-spiceclientgtk-3.0

Por otro lado para cumplir con los requerimientos del Windows 11 (TPM y arranque EFI) instalé: swtpm-tools ovmf

En algunas pruebas en alguna máquina muy "barebones" no tenía un polkit adecuado así que le instalé: lxpolkit Esto no será necesario en sistemas normales con interfaz gráfica ya que ya tendrán instalado un polkit, sino... el propio virt-manager os lo indicará con un error, sino... arrancarlo con "--debug"

Entre los requerimientos de Windows 11 están la CPU, que tiene que ser moderna y que el arranque sea EFI, por ello definiremos una nueva máquina en el virt-manager poniendo de arranque la ISO del Windows descargada de MS, dejaremos que detecte el operativo (detecta Windows 10, por ahora no tienen 11, pero nos sirve) y justo al final, antes de darle a finish, activaremos "Customize configuration before install" y ahí le ponemos en "overview" tendremos que cambiar el apartado "firmware" de BIOS a UEFI con arranque seguro (secboot), además iremos a la ventana "CPUs" y eligiremos en "Configuration" la opción "host-passthrough".

Si le dimos a "apply" en las opciones podemos volver a "overview" y comprobar en el xml que nos queda algo como esto:

machine=pc-q35-7.1 cpu mode='host-passthrough' ... firmware UEFI x86_64: /usr/share/OVMF/OVMF_CODE_4M.secboot.fd

El otro requerimiento que tiene Windows 11 y que no suelen cumplir las máquinas menos modernas es el TPM, pero al ser una máquina virtual usamos el TPM software que hemos instalado y listo. Para esto añadimos a la máquina un dispositivo nuevo de tipo TPM y modelo TIS, y listo, ya podemos darle a "Begin installation".

Esta configuración de máquina es con la tarjeta gráfica qxl, cuando terminemos la instalación de Windows será conveniente instalar en el Windows 11 las spice guest tools que podemos descargar de spice-space.org para tener un buen soporte del esta y el resto del hardware.

Una vez instalemos eso apagamos la máquina y en el virtual-manager en la ventana de la máquina virtual Windows 11, seleccionamos "view", "scale display" y marcamos "autoresize vm with window"

Listo, con esto Windows debería reconocer todo el hardware y hacer escalado de la pantalla al tamaño de nuestra ventana.

martes, 12 de julio de 2022

Programming Retevis RT46

So... some time ago we bought a pair of RT46 for the children, they work pretty well, however we found out on the instructions manual that we can change a lot of parameters through software programming, like disabling CTCSS/DCS so that we can hear other radios that don't have it enabled.

The first thing was to get the software from Retevis. They sent me an exe that looks to be compiled for Windows XP, bad luck there, but we have an old windows tablet around that maybe could run this.

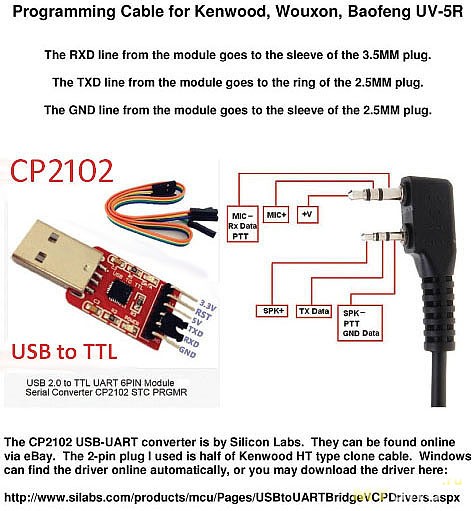
So... we needed the cable and we found this schema:

schema

To build this we would need a USB to 3.3v serial (like the cable I use for La Fonera) and a couple of connectors 2.5 and 3.5 mm audio connectors, wich came out of an old Nokia audio cable and other broken things, plus a 3 pin header, we had it all.

After a bit of soldering we had...

this adaptor

Which seemed ok, but the windows driver for that cable saying... "pl2303hxa phased out since 2012" didn't look ok, and in fact didn't work, we googled to Ruben's github and that solved it, we finally could read the values from the radio and write new ones there :-)

I tried to google some Linux stuff for this products but found none, maybe wine can help here, if I have the time I'll do some tests on this, any better hint?

miércoles, 6 de julio de 2022

Abriendo cerradura de manilla con tapa de acceso no visible

Buenas.

Hace poco tuvimos un problema con una de las manillas de una cerradura, resulta que se habían aflojado los tornillos, pero... los tornillos no se veían, no eran accesibles, estaban ocultos.

Obviamente eso significaba simplemente que había un embellecedor tapando los tornillos, pero el caso era... como se sacaba el embellecedor o que parte de la cerradura desmontar para poder acceder a los tornillos o a desmontar el embellecedor.

Pues bien, luego de darle muchas vueltas, buscar fotos, videos y demás cosas por la red... hicimos lo único que podíamos hacer, darle a la cabeza y luego... desmontar los embellecedores, porque.... tenían que estar como la lógica nos indicaba que tenían que estar, es decir...

El embellecedor estaba metido a presión y hubo que sacarlo con mucho cuidado para intentar dañar lo menos posible la pintura.

Pero al final salió y pudimos apretar los tornillos y solucionar el problema que llevaba meses manifestándose como una holgura.

Y eso es todo, espero que estas fotos sirvan para que otros no se tengan que romper tanto la cabeza como yo mirando videos y fotos que no llevaban a ningún lado, aquí no había agujeros ocultos ni nada por el estilo, solamente presión.

sábado, 12 de marzo de 2022

tcpping-nmap a substitute for tcpping based on nmap

I was about to setup a tcpping based monitoring on smokeping but then I discovered this was based on tcptraceroute which on Debian comes setuid root and the alternative is to use sudo, so, anyway you put it... this runs with root privileges.

I didn't like what I saw, so, I said... couldn't we do this with nmap without needing root?

And so I started to write a little script that could mimic what tcpping and tcptraceroute were outputing but using nmap.

The result is tcpping-nmap which does this. The only little thing is that nmap only outputs miliseconds while the tcpping gets to microseconds.

Hope you enjoy it :-)

martes, 11 de enero de 2022

SUV o la negación de un vehículo urbano deportivo

Está claro que los que acuñaron la etiqueta SUV lo hicieron para vender, y visto lo que se ve en las calles, lo han hecho de miedo.

Han conseguido que se vendan como churros coches más caros, que consumen más, son más inseguros para sus ocupantes y para los atropeyos, ...

El tema es que, hasta que se definió la equiqueta SUV, un coche urbano y deportivo era el Honda Civic, o incluso un Citroën C2, ¿que en que se parecen a un SUV?

En que tienen ruedas, más caras, por cierto, y que desgastan más la carretera, también por su peso y tal claro.

Hace mucho tiempo que quería escribir algo de los SUVs, si me veis conduciendo uno, será que no me ha quedado otra opción, y seguro que no será mío, sino... será que el covid me ha trincado y me ha dejado muy tocado de la cabeza.

No voy a describir todos los problemas que tiene un "SUV" los podéis leer por ahí, pero igual no hace falta, porque cuando vi este video dije... no hacen falta palabras, esto lo explica a la perfección.

https://twitter.com/JamesKPatterson/status/1474089696296906770